

Most self-hosting Next.js articles explain how to host simple Next.js applications, but very few go into how to self-host Next.js apps at scale.
Hosting Next.js at scale requires shared caches, undocumented environment variables, and other secrets that are not well documented elsewhere. This article goes into deep detail on how we've solved those problems at Sherpa.sh.
With the recent scandalous selfie of the Vercel CEO making waves across the online developer community, we hope this article contributes to the broader movement of developers taking control of their own destiny with Next.js.
- Deploying Nextjs Standalone
- Uploading Assets to a CDN
- Image Optimization
- Caching and ISR with Horizontal Scaling
- Drafts and Previews
- Need help self-hosting?
Deploying Nextjs Standalone
The way we recommend deploying Nextjs in production is with the standalone output mode.
This creates a directory with a self contained deployment of your nextjs application pre packaged with all your configuration settings and node modules. We prefer this method because it keeps the size of the deployment as small as possible.
To enable standalone mode just add the following to your next.config.js file:
module.exports = {
    output: 'standalone',
}
When you run your next build command this will create a folder inside of .next named standalone.
(If using Turborepo the standalone folder will have seperate folders for the individual apps that you built for example standalone/apps/web.)

To deploy your standlone Next.js app you only need to copy the standalone folder to your production environment and run the server.js file.
To run your server.js file you have options:
Deploy with Docker
We recommend deploying with a docker container for repeatable builds. You can deploy using the recommended Next.js dockerfile for standalone builds. You can then create multiple containers behind a tool like Caddy or deploy it directly to Kubernetes. At Sherpa.sh we deploy into our K8s clusters.
Deploy on a VM
You can build your project on the VM or build your project locally and SCP the standalone folder up to it. Then on the VM you can use a package like pm2 with Nginx to run multiple processes of your Next.js application (this is highly recommended).
Note: Vercel itself deploys the Nextjs backend as serverless functions on AWS Lambdas. The Nextjs framework itself doesn't formally support serverless deployments as of this writing, although there is an active RFC for deployment adapters that could solve this issue.
Skew protection
Skew protection is builtin by default for self hosted versions. That said, many selfhosted users have reported problems with the built-in Next.js skew protection where client browsers have no way to recover from version skew.
Each deployment uses versioned server actions that need to match the version on the backend. So each time your deploy your app, your users can receive version mismatches between the cached js files they have in their client and the current backend.
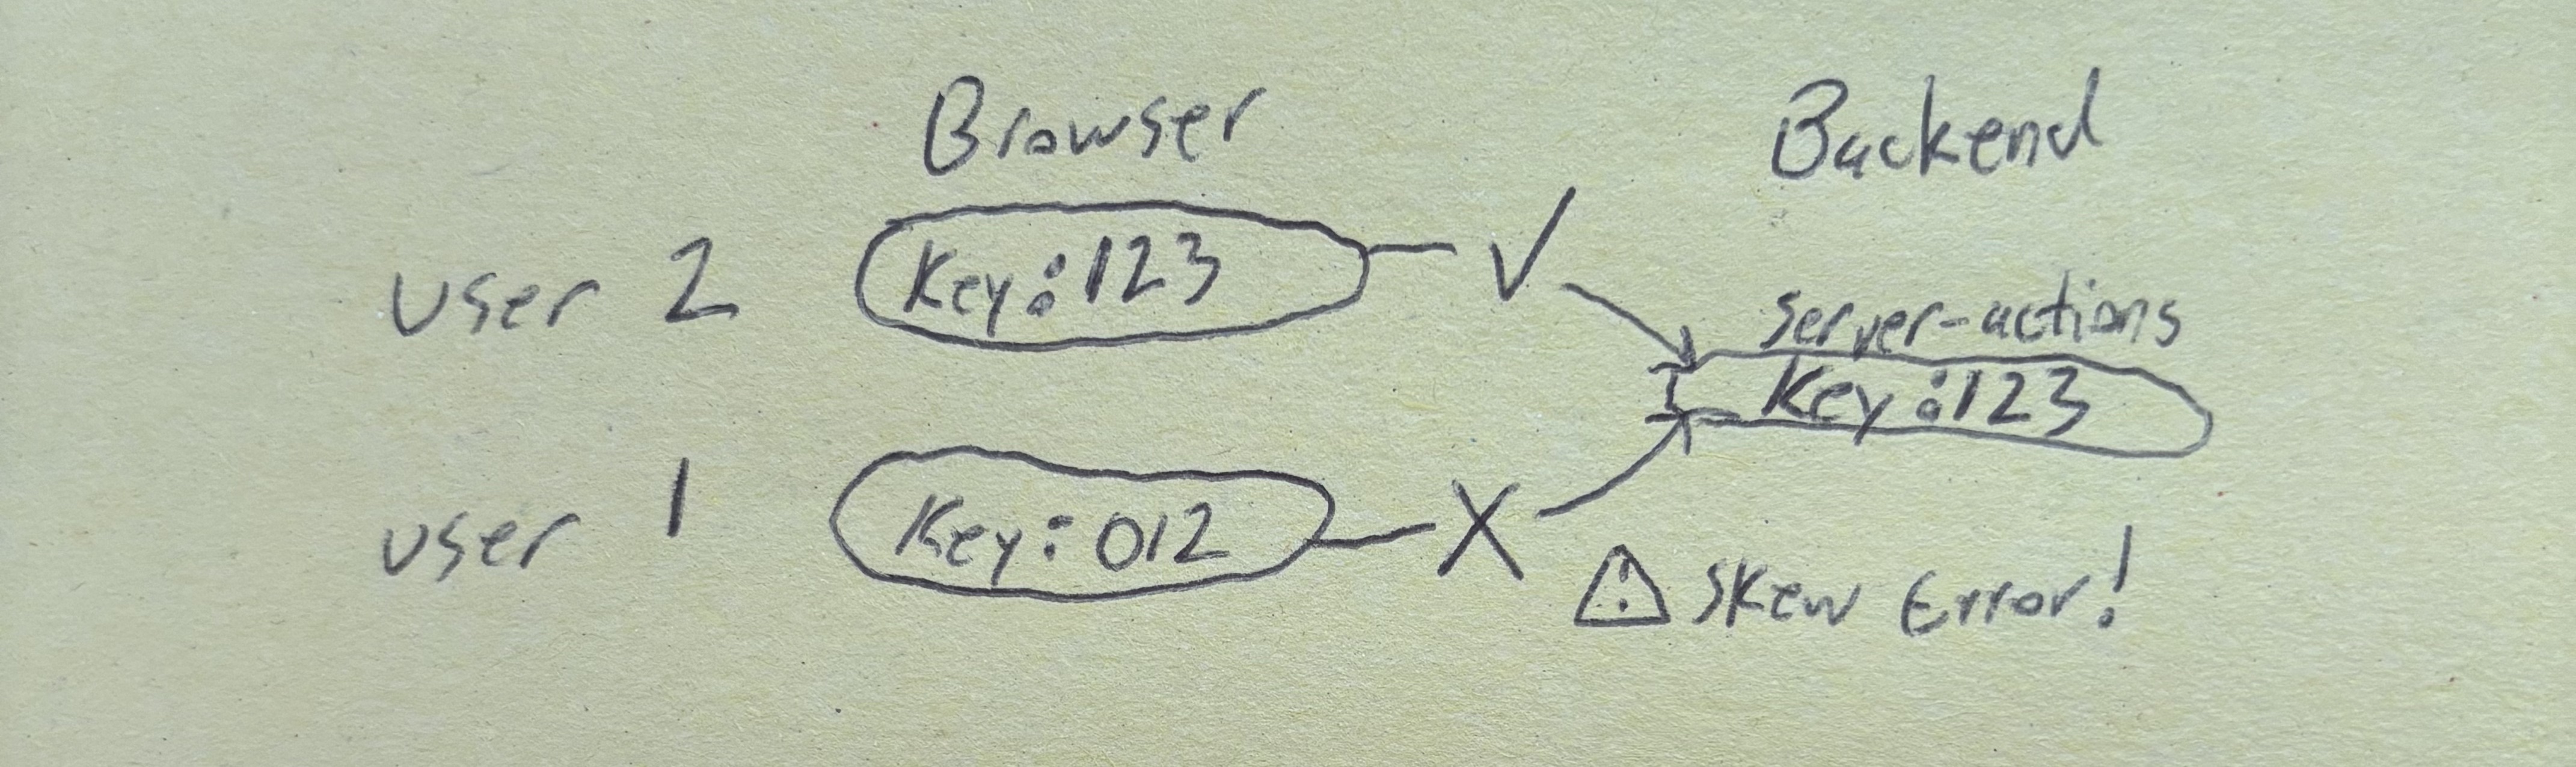
You can mitigate this skew issue by forcing the same version number on each deployment by setting the undocumented variable NEXT_SERVER_ACTIONS_ENCRYPTION_KEY in your next.config.js with a value generated by the script:
const crypto = require('crypto');
const key = crypto.randomBytes(32);
console.log(key.toString('hex'));
Without a consistent NEXT_SERVER_ACTIONS_ENCRYPTION_KEY encryption key between builds:
- Server action IDs change between builds, even when no code changes are made at all
- Each build generates unique IDs, regardless of whether the code is identical
- This creates / exacerbates version skew, each build is a breaking change
With a consistent encryption key:
- Server action IDs remain consistent between builds but only for those server actions whose function signatures did not change.
- If you change the implementation of the function without changing its signature, the server action ID will not change, not even if you change other server actions within the same file
Middleware
Middleware works out of the box in Next.js standalone. It just runs on the server itself instead of at the "edge". You have the option of deploying your middleware file to an edge scripting engine in your CDN, but that can be separate post altogether.
Uploading Assets to a CDN
The standalone folder only includes your node backend code. You still need to make your static and public assets from the build publically available. Your JS files, CSS files, images, etc.
We recommend uploading these files to a CDN to get the fastest load times possible around the world. The CDN you choose will affect your lighthouse scores and page load speeds.
When choosing a CDN you need one that will respect the common cache-control headers that Next.js returns on requests.
Here is a list of headers returned by Next.js endpoints:
public, private, no-store, no-cache, must-revalidate, max-age=, s-maxage=, stale-while-revalidate=, stale-if-error=, immutable
These headers tell the CDN when and how to cache the various files that Nextjs returns to the enduser. For example Cache-Control: s-maxage=86400 tells the CDN to cache the response for 24 hours.
Modern CDNs like Cloudfront, Cloudflare, Fastly respect all of these headers.
Stale-while-revalidate
Of the above, the most important header to check your CDN supports is is the stale-while-revalidate header. Most major CDN providers support this header, but smaller more cost-effective alternatives may not. We spent a good amount of time at Sherpa.sh on the hunt for cost-effective providers that provide the necessary support for Nextjs's cache-control headers.
In prior versions of Nextjs, the stale-while-revalidate header didn't conform to the RFC5861 spec by not providing a time. This was patched in Nextjs v15+. For older versions of next adding experimental.swrDelta: 31536000 in next.config.js will fix the issue by including the time: stale-while-revalidate=31536000.
How to configure CDN Routes
The folders you want to upload to your CDN are the standalone/public and standalone/.next/static folders.
Using assetPrefix
When you upload these files to the CDN your CDN could have a different url than where you application is located. For example your app could be at www.myapp.com and your CDN could be serving assets from static.myapps.com.
If this is the case you will need to define the assetPrefix in your next.config.js file to reflect the URL of your static assets in the CDN.
Using Edge Rules
At Sherpa.sh take another route, which is more robust and provides greater caching performance. We point the CDN origin directly at the Nextjs application and use Edge Routing Rules to redirect requests for static assets to our CDN Bucket.
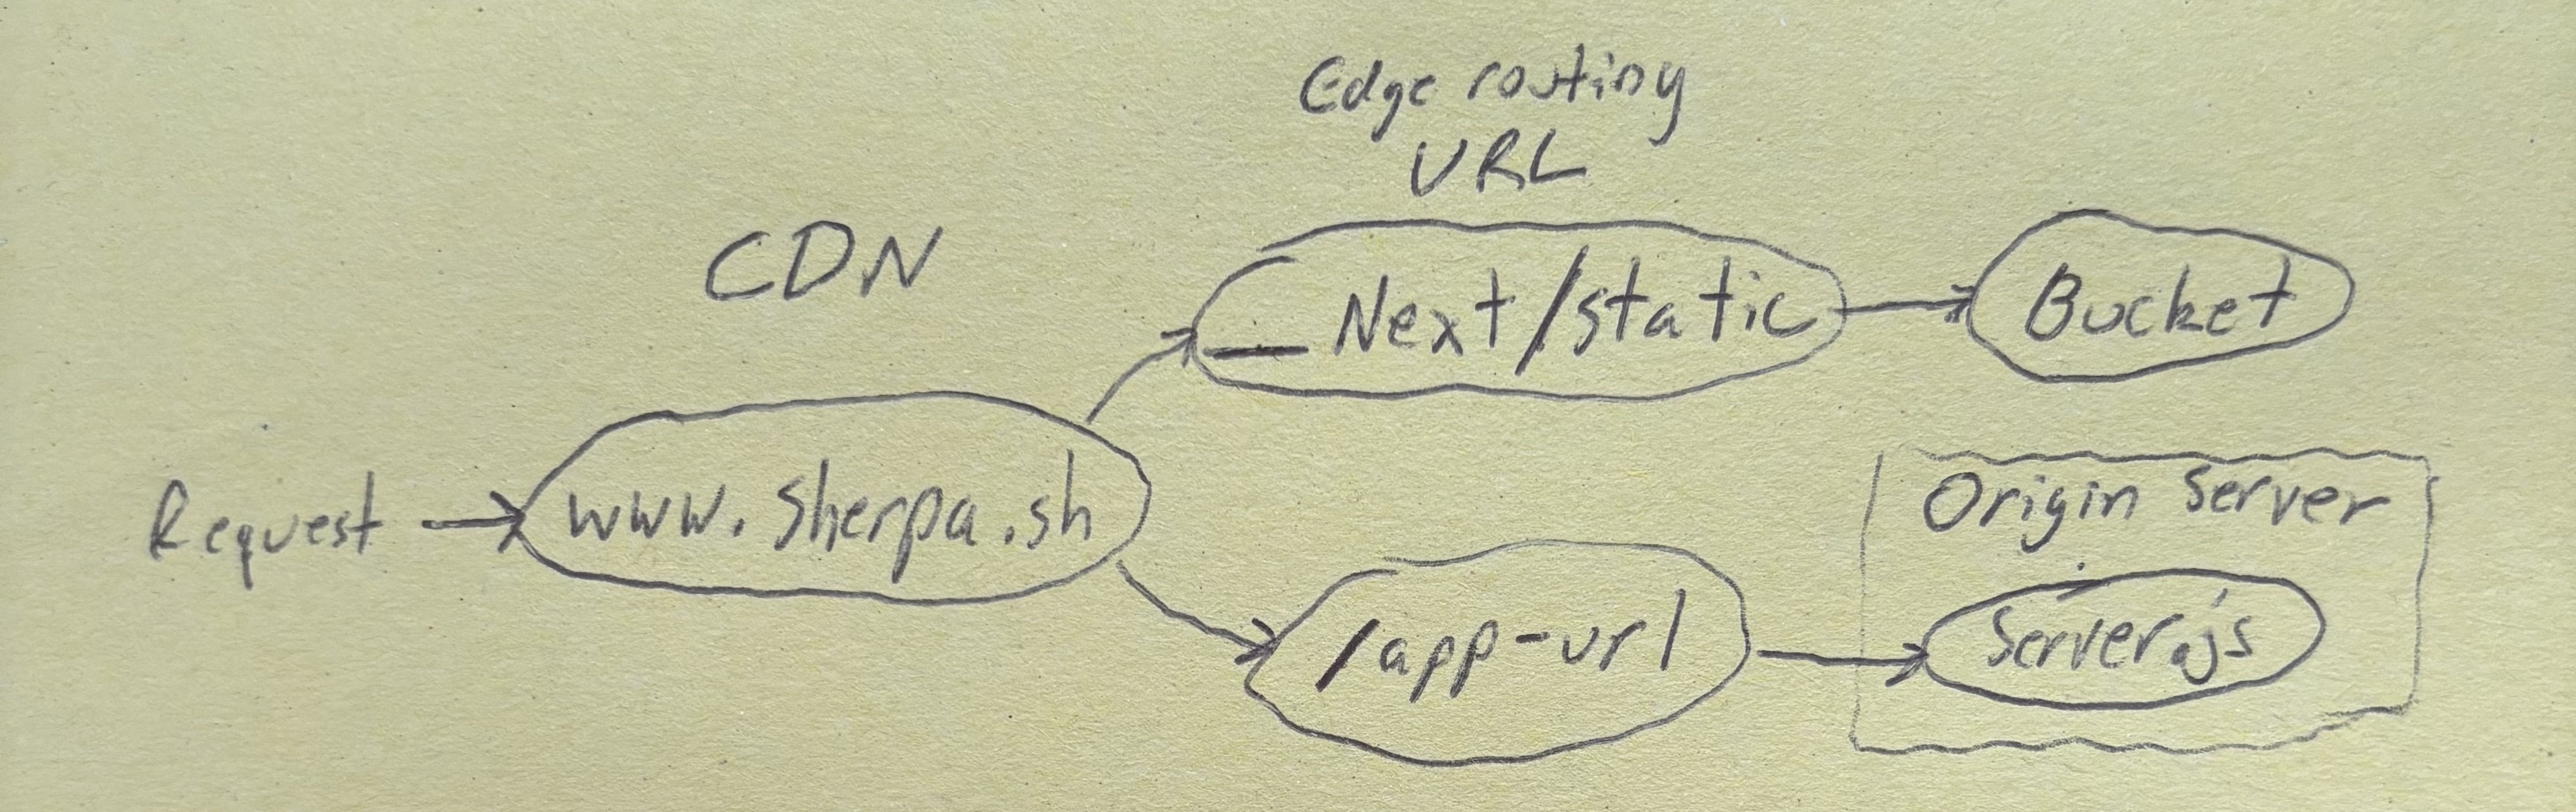
This lets the static assets and the app itself keep the same hostname. It also allows the CDN to cache responses from the backend if they include cache-control headers.
When creating the Edge rules you need to make sure you route _next/* to your static assets, but make sure you ignore _next/image since this route is used by the Next.js's builtin image optimization with Sharp (more on this further down).
Image Optimization
Image optimization works out of the box and runs inside your standlone Nextjs deployments using the sharp package.
When you make a request to _next/image?url=... Next.js will create an image and save it to the .next/cache folder.
The node process running your Next.js server.js file needs read/write permissions to this folder.
Note: For Next.js v14 and earlier you need to manually install sharp.
Horizontal Scaling of Image Optimization
Saving optimized images to the filesystem presents a problem when scaling across multiple nodes. Without a shared filesystem each node will have to re-optimize images and save to its own local cache directory. Each node optimizing the same image will slow down load times and consume more processing power on your backend.
The solution is to use shared persistant storage. At Sherpa.sh we use Kubernetes persistant volume claims. If you are not on Kubernetes you can use your cloud provides shared persistant storage or Samba sharing between linux machines.
Another alternative is to use your CDN provider or a Thirdparty's image optimization service. In this case you would need to write you own custom image loader or stop using the builtin <Image /> component and use the default <img> tag and point to the url of your image optimization service.
Caching and ISR with Horitzontal Scaling
By default Next.js uses the a directory on the local filesystem for caching (unstable_cache, use cache, etc) and ISR. If you are running on a single machine then you can leave everything how it is and have caching work as expect.
But if you are scaling Next.js, caching to the local file system presents the same problems as Image Optimization.
You need a durable cache to share data across instances and to maintain the existing cache when deploying new changes.
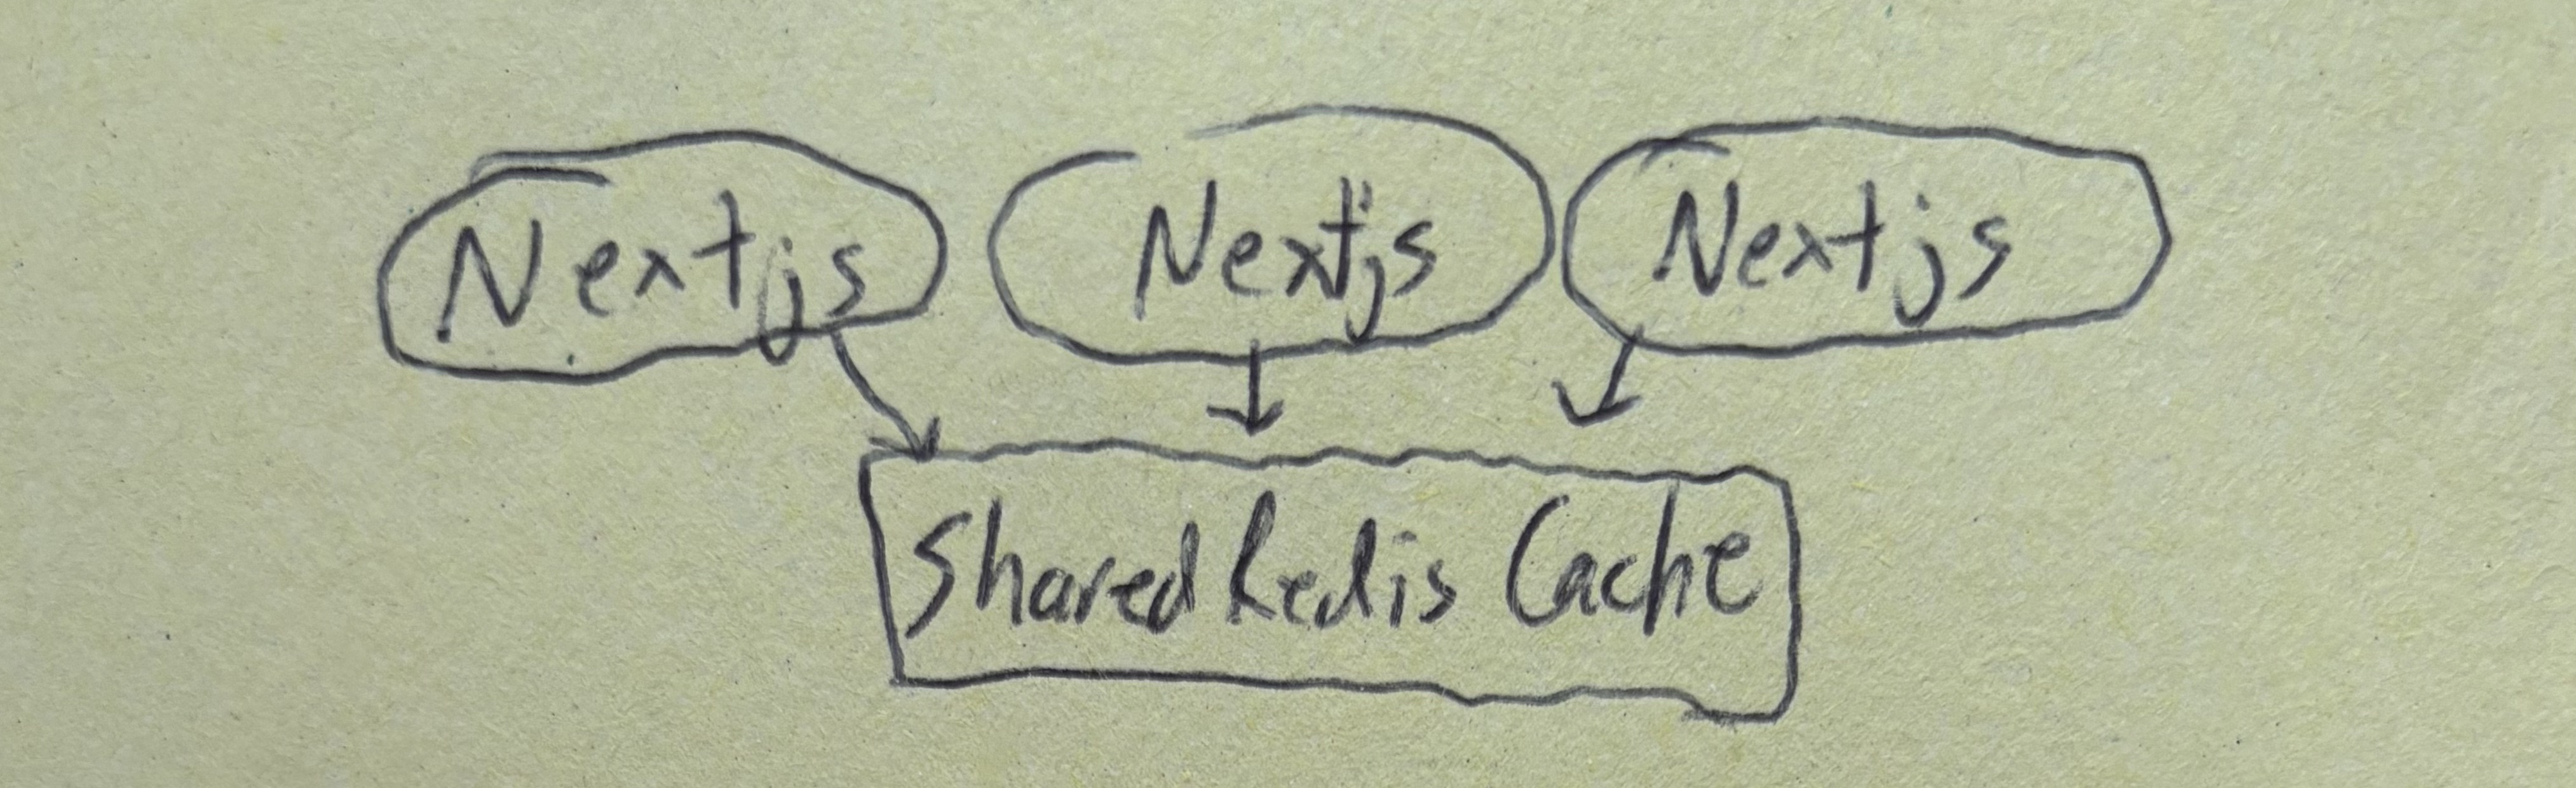
To handle durable caching you need to write your own custom cacheHandler. There is an official redis implementation for cache handling in the Next.js example repo.
There are also opensource projects like @neshca/cache-handler which handle edge cases if you are deploying complex Next.js applications.
Cache Handler Edge Cases
In our experience the cache-handler internal workings is very poorly documented and there are many sharp edges where you can cut yourself if you don't have an intimate knowledge of the cache-handler internals.
Pre-rendered pages skip the cache handler
When your build process pre-renders pages, Next.js will skip the cache handler all together and save this files into the file system in the directories: .next/server/app, .next/server/pages, and .next/cache/fetch-cache.
When you visit these pages Next.js will try to retrieve them using the cache-handler. So you need to prepopulate the cache with these files using the set method in your custom cache handler.
The @neshca/cache-handler project above has builtin functionality to pre-populate the cache on start.
Constant breaking changes
It is very very very very common for the Vercel team to break custom cache handler functionality on minor and major version updates.
Therefore, you need to test your cache handler thoroughly on every Next.js release before upgrading your application. This is likely the biggest bottleneck for teams self hosting Nextjs at scale.
Drafts and Previews
Draft mode allows you to preview draft content from your headless CMS in your Next.js application.
This works under the hood by setting __prerender_bypass=SECRET in the browser. If you use draft mode you'll need to make sure that your CDN forwards this cookie and all requests with the cookie bypass the CDN's caching completely.
This can typically be accomplished with your CDN's edge rule functionality.
Need help self-hosting?
We love sharing what we know and helping the developer community.
So please, feel free to reach out to us directly for help or questions. We'd be happy to share our experience.
If all of this sounds duanting, you can try our services at Sherpa.sh where we've already built all of this functionality into our simple, cost-effective Vercel alternative.
Did you find this article helpful? If so, we'd appreciate you sharing it on Reddit, Hackenews, Bluesky, X, or wherever you hang out online.